Source: http://www.thevedahouse.com/2011/08/guest-post-diy-project-over-sometimes-sweet/
Block printing on fabric can be as simple or as complicated as you make it. I'd suggest sticking with a simple design for newbies and working you're way up as your comfort level grows. You can use any kind of fabric you'd like, but the smoother the better. Once your done printing, you'll have a totally unique piece of fabric to turn into anything you dream. (seat covers, pillow cases, kitchen napkins, etc) Feel free to email me with questions if you get stuck during the process. There are also a lot of online tutorials out there you can peruse.
THE SIMPLE STEPS:
1. Draw your design directly onto the linoleum block with a pencil. Using a pencil will allow you to change things up if you choose. Remember, this doesn't need to be perfect.
2. Once you have the design how you want it, outline the design in permanent marker so it is easier to see while you are carving.
3. Etch/carve out the negative areas on the linoleum with carving tools. ( I have a tool set that allows me to switch between blade thicknesses for different line qualities) *cut away from your body ;)
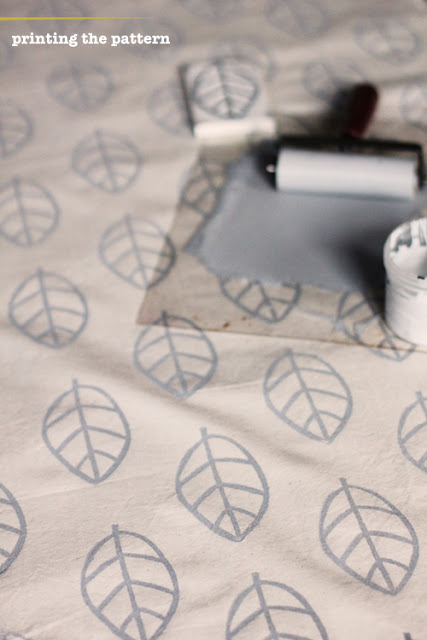
4. Using a brayer ( or paintbrush), apply fabric ink on your linoleum block. "Ink" up your brayer by rolling it back and forth over the ink in your ink tray. Make sure the entire surface is covered in ink.
5. Stamp the design onto the right side of your fabric by using firm even pressure. (your pattern can be completely random or more geometric) Continue to ink the linoleum block as necessary.
6. When you are done stamping, let your fabric dry over night
7. After completely dry, iron your fabric to set the ink in place (follow ink brand instruction). Donzo!
*Tips:
- if you by a linoleum block that is super stiff and hard to cut into, you can iron/warm the block on the iron's lowest setting.
- if you are feeling unsure, you can do test prints on sheets of paper
- there is no need to carve deep cuts to make it work properly. Carving shallow cuts works just as well. Hooray!
Block printing on fabric can be as simple or as complicated as you make it. I'd suggest sticking with a simple design for newbies and working you're way up as your comfort level grows. You can use any kind of fabric you'd like, but the smoother the better. Once your done printing, you'll have a totally unique piece of fabric to turn into anything you dream. (seat covers, pillow cases, kitchen napkins, etc) Feel free to email me with questions if you get stuck during the process. There are also a lot of online tutorials out there you can peruse.
THE SIMPLE STEPS:
1. Draw your design directly onto the linoleum block with a pencil. Using a pencil will allow you to change things up if you choose. Remember, this doesn't need to be perfect.
2. Once you have the design how you want it, outline the design in permanent marker so it is easier to see while you are carving.
3. Etch/carve out the negative areas on the linoleum with carving tools. ( I have a tool set that allows me to switch between blade thicknesses for different line qualities) *cut away from your body ;)
4. Using a brayer ( or paintbrush), apply fabric ink on your linoleum block. "Ink" up your brayer by rolling it back and forth over the ink in your ink tray. Make sure the entire surface is covered in ink.
6. When you are done stamping, let your fabric dry over night
7. After completely dry, iron your fabric to set the ink in place (follow ink brand instruction). Donzo!
*Tips:
- if you by a linoleum block that is super stiff and hard to cut into, you can iron/warm the block on the iron's lowest setting.
- if you are feeling unsure, you can do test prints on sheets of paper
- there is no need to carve deep cuts to make it work properly. Carving shallow cuts works just as well. Hooray!


Comments
Post a Comment