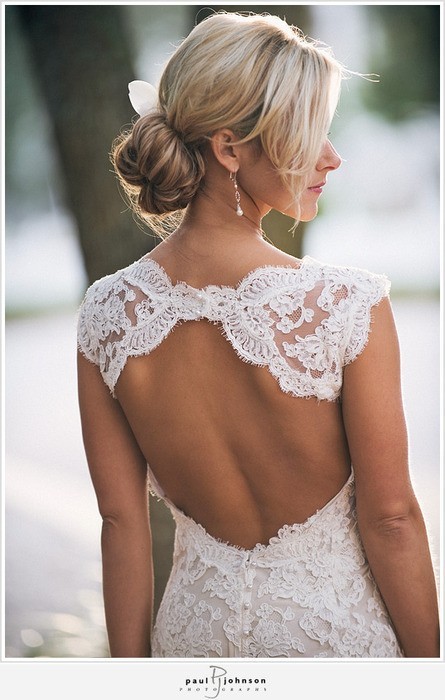
The dress we saw some where that Sam loved.
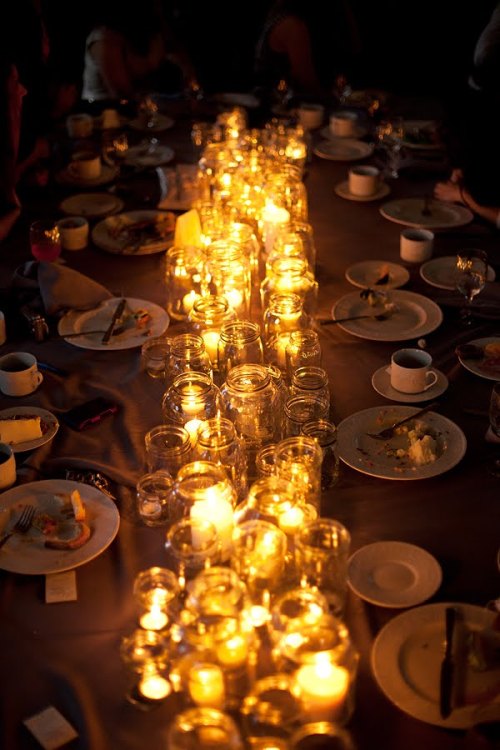
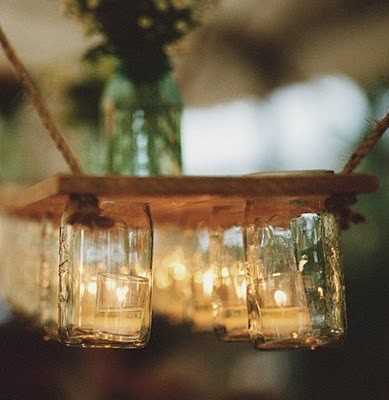
The reception with all the candles that Sam wants
 B
Bfor her Beta fish
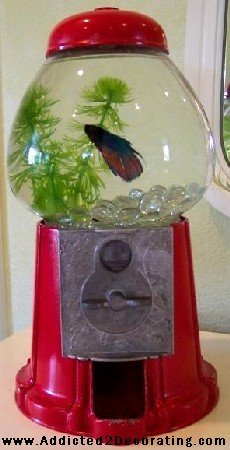
source: http://www.addicted2decorating.com/diy-project-accessories-gumball-machine-fish-bowl.html
I believe that my daughter would love this cake for her wedding as she is going to have a candy table.....what do you think?
Source: http://www.loveandoliveoil.com/2010/11/rainbow-cake.html
rainbow cake with white chocolate buttercream
This recipe is a bit uneven. I used 6" pans, and the layers were too thick and and I had way too much frosting. I think it'd be better suited to a 7" or even 8" cake, so adjust as necessary depending on the size of your cake pans.
Cake recipe from Cooks Illustrated. Frosting recipe from Martha Stewart.
INGREDIENTS:
For Cake:
2 1/4 cups cake flour (9 ounces)
1 cup whole milk, at room temperature
6 large egg whites (3/4 cup), at room temperature
2 teaspoons almond extract
1 teaspoon vanilla extract
1 3/4 cups granulated sugar (12 1/4 ounces)
4 teaspoons baking powder
1 teaspoon table salt
12 tablespoons unsalted butter (1 1/2 sticks), softened but still cool
Red, orange, yellow, green, blue, and purple gel food coloring
For Frosting/Filling:
2 1/2 cups granulated sugar
10 large egg whites
2 pounds (8 sticks) unsalted butter, cut into tablespoons, softened
2 teaspoons pure vanilla extract
1 pound best-quality white chocolate, melted and cooled
2 1/2 cups granulated sugar
10 large egg whites
2 pounds (8 sticks) unsalted butter, cut into tablespoons, softened
2 teaspoons pure vanilla extract
1 pound best-quality white chocolate, melted and cooled
DIRECTIONS:
Preheat oven to 350 degrees. Prepare your cake pans by first liberally buttering the pans, then line the bottoms with parchment paper rounds. Butter the rounds and set aside.
Pour milk, egg whites, and extracts into 2-cup glass measure, and mix with fork until blended. Mix cake flour, sugar, baking powder, and salt in bowl of electric mixer at slow speed. Add butter; continue beating at slow speed until mixture resembles moist crumbs, with no powdery streaks remaining. Add all but 1/2 cup of milk mixture to crumbs and beat at medium speed (or high speed if using handheld mixer) for 1 1/2 minutes. Add remaining 1/2 cup of milk mixture and beat 30 seconds more. Stop mixer and scrape sides of bowl. Return mixer to medium (or high) speed and beat 20 seconds longer.
Divide batter evenly between six medium bowls. Add enough of each color of food coloring to each bowl, whisking, until desired shade is reached. Transfer each color to an individual cake pan. Transfer to oven and bake until a cake tester inserted into the center of each cake comes out clean, about 15-25 minutes (working in batches if necessary).
Let cakes rest in pans for 3 minutes. Loosen from sides of pans with a knife, if necessary, and invert onto wire rack. Allow to cool completely. At this point, the layers can also be wrapped in plastic wrap and frozen.
To make frosting, put sugar and egg whites in the heatproof bowl of an electric mixer, and set over a pan of simmering water. Whisk constantly until sugar is dissolved and mixture registers 140 degrees on an instant-read thermometer.
Transfer bowl to an electric mixer fitted with the whisk attachment; beat on medium-high speed until fluffy and cooled, about 10 minutes. Continue beating until stiff peaks form.
Reduce speed to medium-low; add butter by the tablespoon, beating well after each addition. Beat in vanilla and white chocolate. (Any leftover frosting can be refrigerated in an airtight container up to 3 days or frozen up to 1 month.)
To assemble, using a serrated knife, trim tops of cakes to make level. Place four strips of parchment or waxed paper around perimeter of a cake stand or lazy Susan. Place the purple layer on the cake plate. Scoop a 1/2 cup (or more for a larger cake) buttercream filling over the first layer and spread with a small offset spatula so it extends just beyond edges. Repeat process with blue, green, yellow, and orange layers.
Place the remaining red layer on top, bottom-side up. Gently sweep away any loose crumbs with a pastry brush. Using an offset spatula, cover the top and sides with a thin layer of frosting (also use any of the excess frosting visible between the layers). Refrigerate until set, about 30 minutes.
Using a large offset spatula, cover cake again with remaining frosting.
Comments
Post a Comment